How to Upload Task From Excel to Planner
"I've got 100s of tasks in an Excel file that I'd like to import into Planner, is that possible with Power Automate?"
If y'all decide to utilize Microsoft Planner for a light project direction, peradventure you lot don't want to get-go from scratch. Maybe you lot already use an Excel file to track the tasks and you'd like to import them into Planner. While there're some 3rd party solutions to do that, information technology'due south not necessary to utilise one. You can build a Power Automate flow for the tasks import from Excel to Planner.
Prepare the Excel file
Earlier yous starting time with the flow, you lot must gear up the Excel file with tasks. There're a few mandatory prerequisites:
- All the tasks and their data must be in a tabular array, one row per task.
- The Excel file must be stored in SharePoint or OneDrive.
And a few optional prerequisites. Depending on the data you want to import, some columns should have a specific format:
- Assigned To user should be user email address.
- Start and Due date must exist Appointment only, without time
The flow in this mail service volition import an Excel file every bit shown below with the v columns table.

Build the Power Automate flow
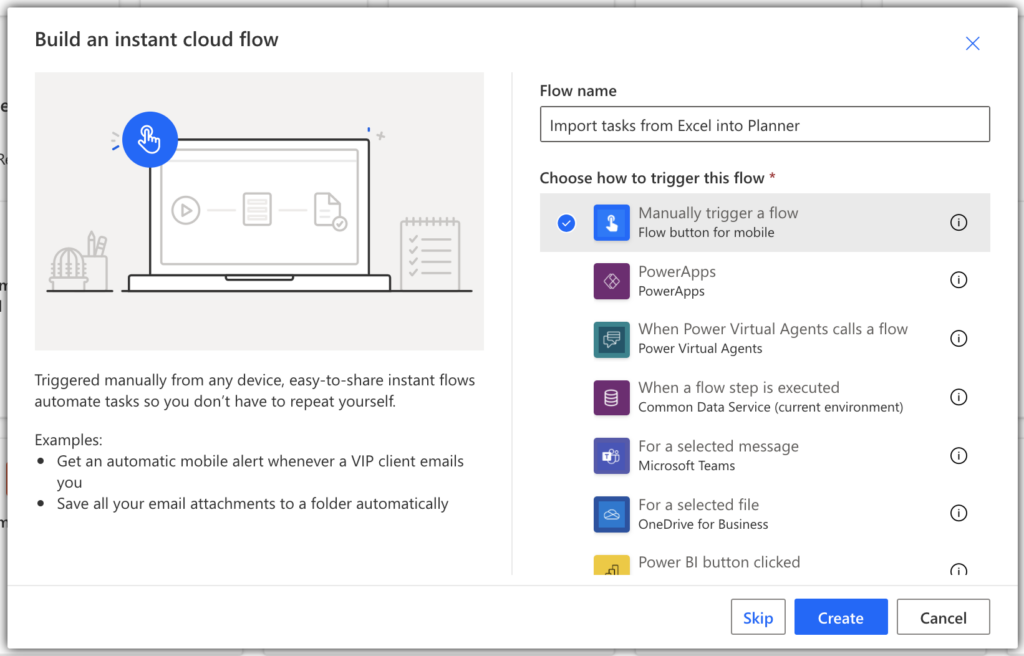
Since this article is well-nigh the initial tasks import, the catamenia will be started manually. Start from the 'Instant cloud flow' with transmission trigger.
List rows nowadays in the Excel table
The kickoff step in the flow should be to listing all the rows in the Excel file. Every bit already mentioned, all the data for each task must be on a single row – if y'all get all rows, you get all tasks.
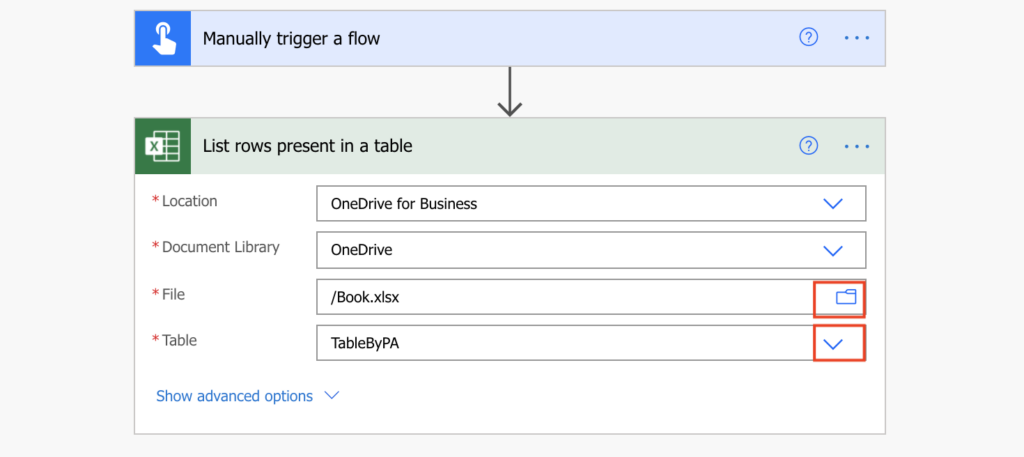
Add the 'Listing rows present in a table' activity to your flow and select the file location, name and the tabular array with tasks. Use the buttons to select the file and the table, don't try to type information technology. While it shows the file proper noun, on the background information technology needs the file identifier and it's easier if you select the file from the choices.
In the example below the Excel file is stored in OneDrive, the file is called Volume.xlsx and the table TableByPA.
The output of this action will exist an array with all rows = all tasks and their data. One time you accept the array with rows (tasks), you tin loop through all of them and create a Planner task for each.
Create the Planner chore
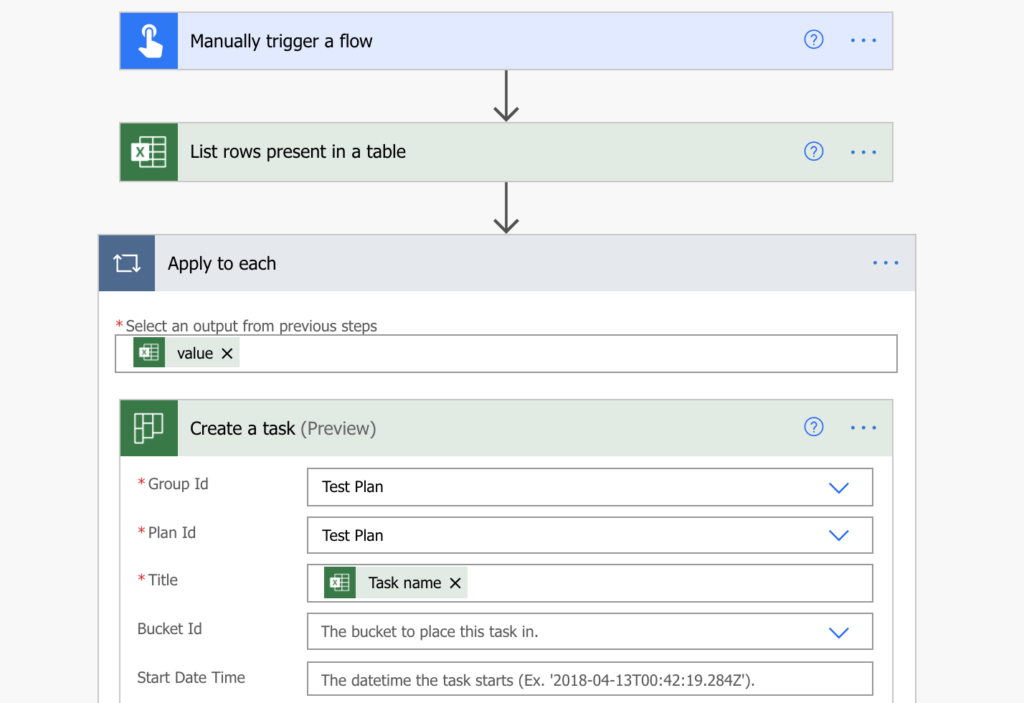
Ability Automate has 2x action chosen 'Create a task', ane of them with (Preview) in the name. The only difference is that the (Preview) action can assign a priority to a chore, I'd use that one.
Add the 'Create a chore' action and apply the 'Task name' from the Excel table as the job 'Championship', that will add together the 'Use to each' action automatically. Information technology'due south the loop that's necessary to process all the rows one by 1.
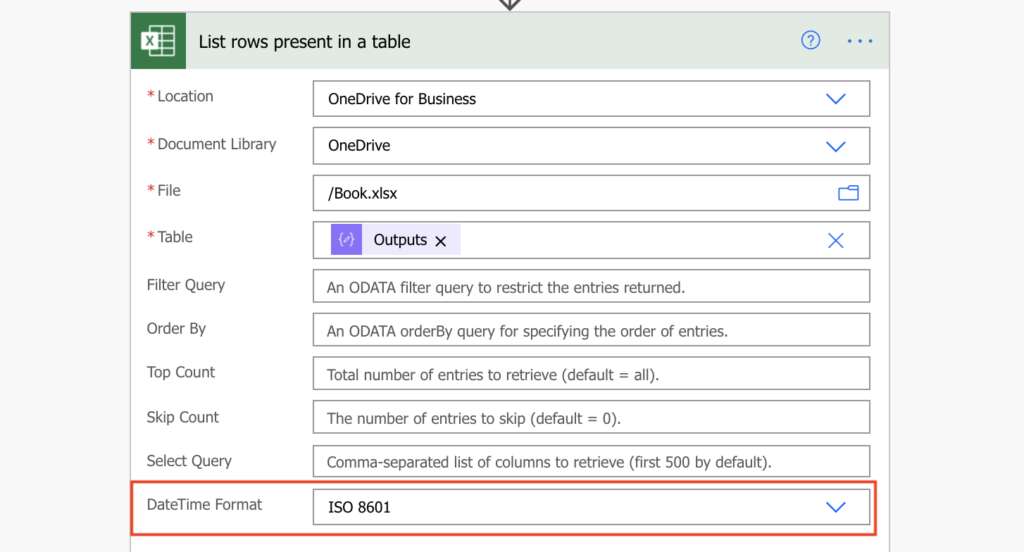
UPDATE: there was a change in the Excel connector after the original article was published. Information technology's now much easier to work with dates as you can get them in ISO format directly from the 'List rows nowadays in a table' action. The two chapters Format the date and Excel dates with time are not necessary anymore.
Just the expressions to check if the columns contain a engagement are nonetheless valid, you can also extend them to move due dates from weekend to Monday.
if(equals(items('Apply_to_each')?['StartDate'],''),null,items('Apply_to_each')?['StartDate']) if(equals(items('Apply_to_each')?['DueDate'],''),null,items('Apply_to_each')?['DueDate']) Format the date – only if you become the date equally Serial Number
While it's like shooting fish in a barrel to apply the 'Task name' and 'Assigned User Ids' (if you apply e-mail addresses), it's more complex with dates. Excel date columns don't give y'all a engagement, they give yous a number. A number of days since base date of 12/xxx/1899 (you tin can read a story backside that date hither).
To get a engagement from the number provided past Excel, y'all must add the number (of days) to the base date and format information technology.
addDays('12/30/1899',int(items('Apply_to_each')?['StartDate']),'yyyy-MM-ddTHH:mm:ss') addDays('12/30/1899',int(items('Apply_to_each')?['DueDate']),'yyyy-MM-ddTHH:mm:ss') And you lot should extend it to handle also empty Showtime or Due appointment.
if(equals(items('Apply_to_each')?['StartDate'],''),nada,addDays('12/xxx/1899',int(items('Apply_to_each')?['StartDate']),'yyyy-MM-ddTHH:mm:ss')) if(equals(items('Apply_to_each')?['DueDate'],''),zilch,addDays('12/30/1899',int(items('Apply_to_each')?['DueDate']),'yyyy-MM-ddTHH:mm:ss')) 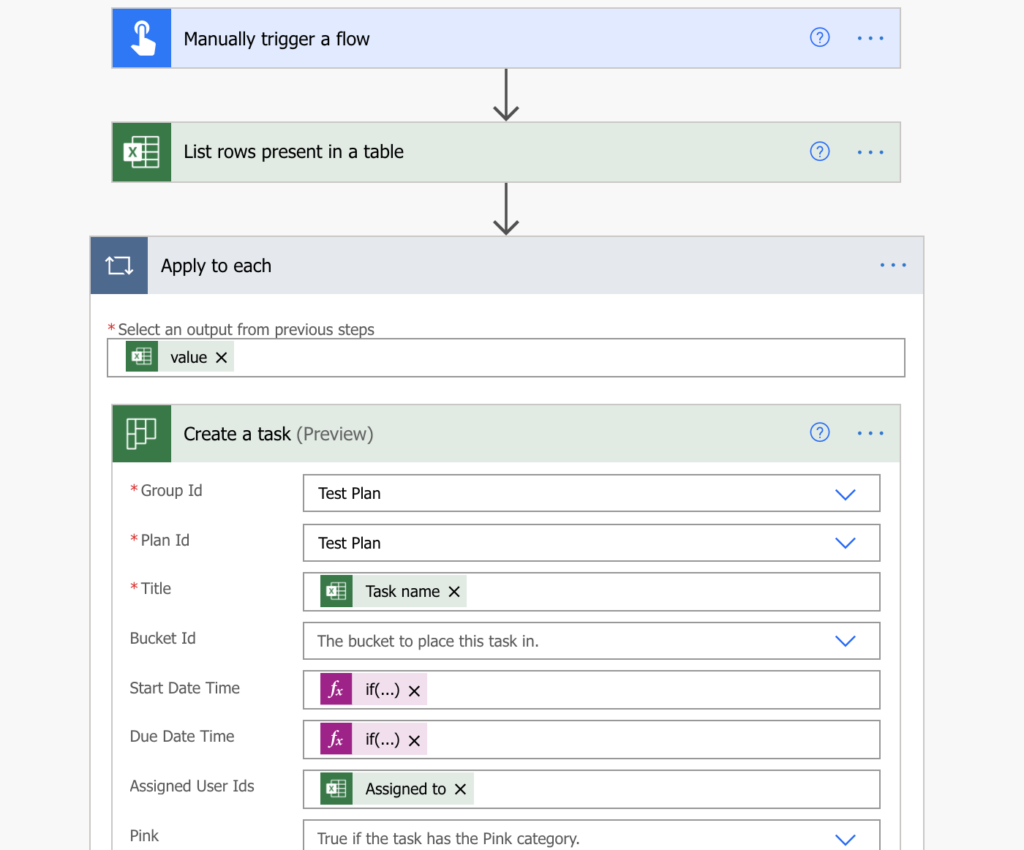
Note: the Beginning date and Due date columns are called 'StartDate' and 'DueDate' in my table, in your Excel table they might have a different name. You should apply the proper name of your columns in the expressions above.
Excel dates with time – only if you go the date every bit Se
If the dates in Excel contain likewise time, you must become rid of the time office and keep only the whole number = whole days. That means, convert the engagement from Excel into bladder(…) number with decimal spaces. Then formatNumber(…) to remove the decimal part, and convert it back into number with int(…) expression. But then you tin can utilise information technology in the expression.
if(equals(items('Apply_to_each')?['StartDate'],''),null,addDays('12/30/1899',int(formatNumber(bladder(items('Apply_to_each')?['StartDate']),'#')),'yyyy-MM-ddTHH:mm:ss')) if(equals(items('Apply_to_each')?['DueDate'],''),null,addDays('12/thirty/1899',int(formatNumber(bladder(items('Apply_to_each')?['DueDate']),'#')),'yyyy-MM-ddTHH:mm:ss')) Update the Planner job details
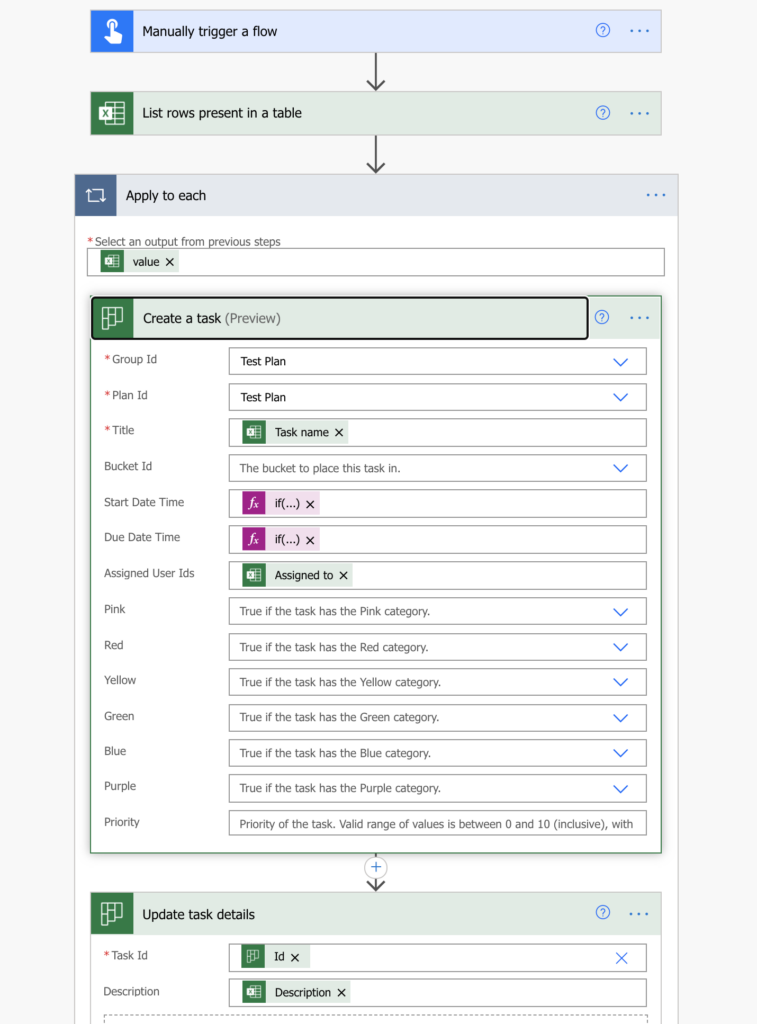
The last step is to update the job description. You can't enter information technology straight when creating a job, you must add 1 more action: 'Update job details'. Use the 'Id' output from 'Create a task', and update the chore with the 'Description' from the Excel table.
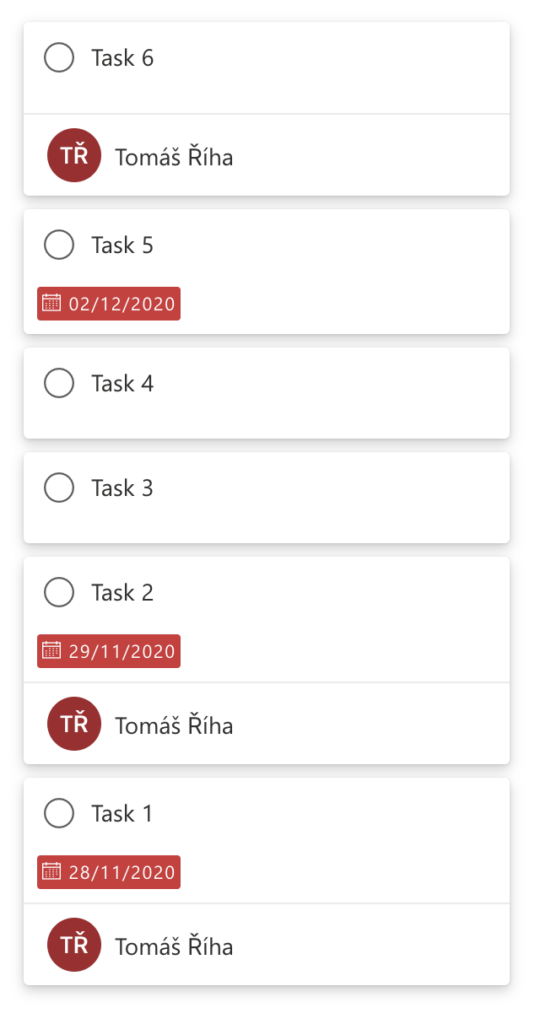
Running this flow on the instance Excel table to a higher place volition create half-dozen tasks in the Planner.
Summary
As you can see in this post, it's not complicated to import Excel data with Power Automate. The biggest complication are the date columns and the expressions in them, otherwise it'southward very straightforward flow. Get all rows and create a split up task for each of them.
Merely it'southward non necessary to take all rows, you can go only some of them, east.g. skip the empty ones and import the rest. And if you desire, you can add also checklists or attachments to the task.
You tin can even import tasks from a single Excel file into various groups/plans/buckets, or build a flow to ship emails for completed tasks from a specific bucket.
You lot can also add a reporting flow to go along track of the new, closed and open tasks.
Source: https://tomriha.com/how-to-import-tasks-from-excel-into-planner-with-power-automate/